
It’s been a few years since I got the idea that I wanted a pond in my garden. But I’ve procrastinated, making excuses every year for why it wasn’t going to happen: I’m too old to dig it myself, it’ll be too expensive to pay someone else to install a pond, maybe it’ll add too much maintenance work to my garden. Every year I’ve been getting increasingly irritated at myself for being so indecisive. Recently, quite out of the blue, things happened that finally propelled me forward. I was inspired by someone else sharing photos of a weekend pond project in her yard, and I thought it didn’t look all that difficult. (I blissfully ignored the fact that she’s about 30 years younger than me and had her husband helping her, and was using a smaller preformed pond.) I think the fact that I have another birthday coming up in a couple weeks was another factor that put me in the right frame of mind to do this — I didn’t want to age one more year without a pond!
The last thing that contributed to my willingness to dive into this big project is that I was on a one-week course of oral steroids for a thumb injury, so I figured the steroids would help minimize any pain I might feel from some heavy manual labor. Ha, genius, I tell you!
I chose a location for the pond between two of my native garden beds. I’d like to say a quick word about the lawn in these photos, lest you judge me harshly. First of all, we went more than three weeks without a drop of rain, so everything is brown. But I also have lots of crabgrass and other weeds in the back yard because I refuse to use chemicals to encourage a “lush” lawn. My goal is to eliminate as much lawn as I can and replace it with habitat that supports more biodiversity. In the meantime, I’m tolerating some ugliness. So please disregard the grass and focus on the lovely new pond and all the wildlife it’s sure to bring to my garden!

So on a Friday I went to the pond garden store where I bought the materials they said I would need according to my intended measurements: felt underlayment, 45 mil liner, and a 3/4-ton pallet of stones. I drove home from there and immediately got to work digging, afraid that I might lose my momentum with any further delay. Here I show a series of photos of the process.

I used spray paint to mark out the digging zones. The outer circle would be the perimeter of the pond, and the inside circle would be the one-foot-deep planting shelf. The advice I got from the pond store was to remove the sod around the edges first, to make a shallow bed for the edging rocks to sit in. This next photo shows that done, and a new smaller circle marked inside for the two-foot deep center portion of the pond.

I thought it would be easiest to dig the deep inner portion first, and then I could more easily dig the shallower planting shelf. So that’s what I’m doing here. I’m lucky that my soil is Oak Openings sand, and very easy to dig. I got slowed down by some roots, but overall, the digging was the easiest part of this project. And the first day was nice and cool with a breeze, so that helped keep me comfortable.


The next day I finished the digging, and saw my first pond visitor even before there was any water in it. A chipmunk ran down in the hole and out the other side, just checking out the fresh dirt, I suppose.


This was the end of day two, with all digging done. It’s nine feet long and five feet wide, and two feet deep in the middle. I still needed to do some cleanup and leveling of the various edges, but that was planned for Sunday, day three.
On Sunday I found that the sand kept collapsing as I tried to firm up the edges and check for any roots that I’d missed. It’s important to make sure there aren’t any sharp objects that can pierce the (expensive) liner. So I sprayed the soil with a light mist of water and that fixed the problem so I could firm things up. At this point I was so motivated that having to wait for the rocks was frustrating. They’d told me the rock delivery would be the following week, but they weren’t sure when. As it turned out, they delivered the rocks that same day, even though it was a holiday (Father’s Day — and yes, I took a break to talk to my Dad).

I should mention here that, thanks to the steroids, I was feeling absolutely no pain after all the digging. And I felt almost superhuman, like I could do this every day. It’s a good thing I can’t get my hands on those pills without a prescription because I might be tempted to take them whenever I have a big project. Now that I’ve finished the six-day course of steroids, I’ve come crashing down and am having some pain again. But anyway, back to the project.
Here’s where they left 1500 pounds of rocks. I used my wheelbarrow to take them to the far side of the back yard, about 80 pounds at a time. The tires on the wheelbarrow went almost flat if I put much more weight in it, so I had to make a lot of trips back and forth. This part was definitely not fun, but I finished it in about two hours. I realized that I couldn’t leave those rocks out there overnight without risking them being stolen, so I had no choice but to keep moving them.

I’d been advised to clean each rock so they wouldn’t muck up the pond, so I spread them out in the yard and got to work. This was messy, hard, tedious work.

The next morning my friend Kate came over to help me lift the heavy pond liner and drop it down into the hole. And at that point I was ready to start laying rocks. I spent all day Monday hosing dirt off of individual rocks and finding appropriate placement for them. One tricky part of this was making sure the liner was folded up behind the backs of the rocks so that soil wouldn’t wash into the pond. I worked my way slowly around the perimeter, cutting away excess liner as I placed rocks.
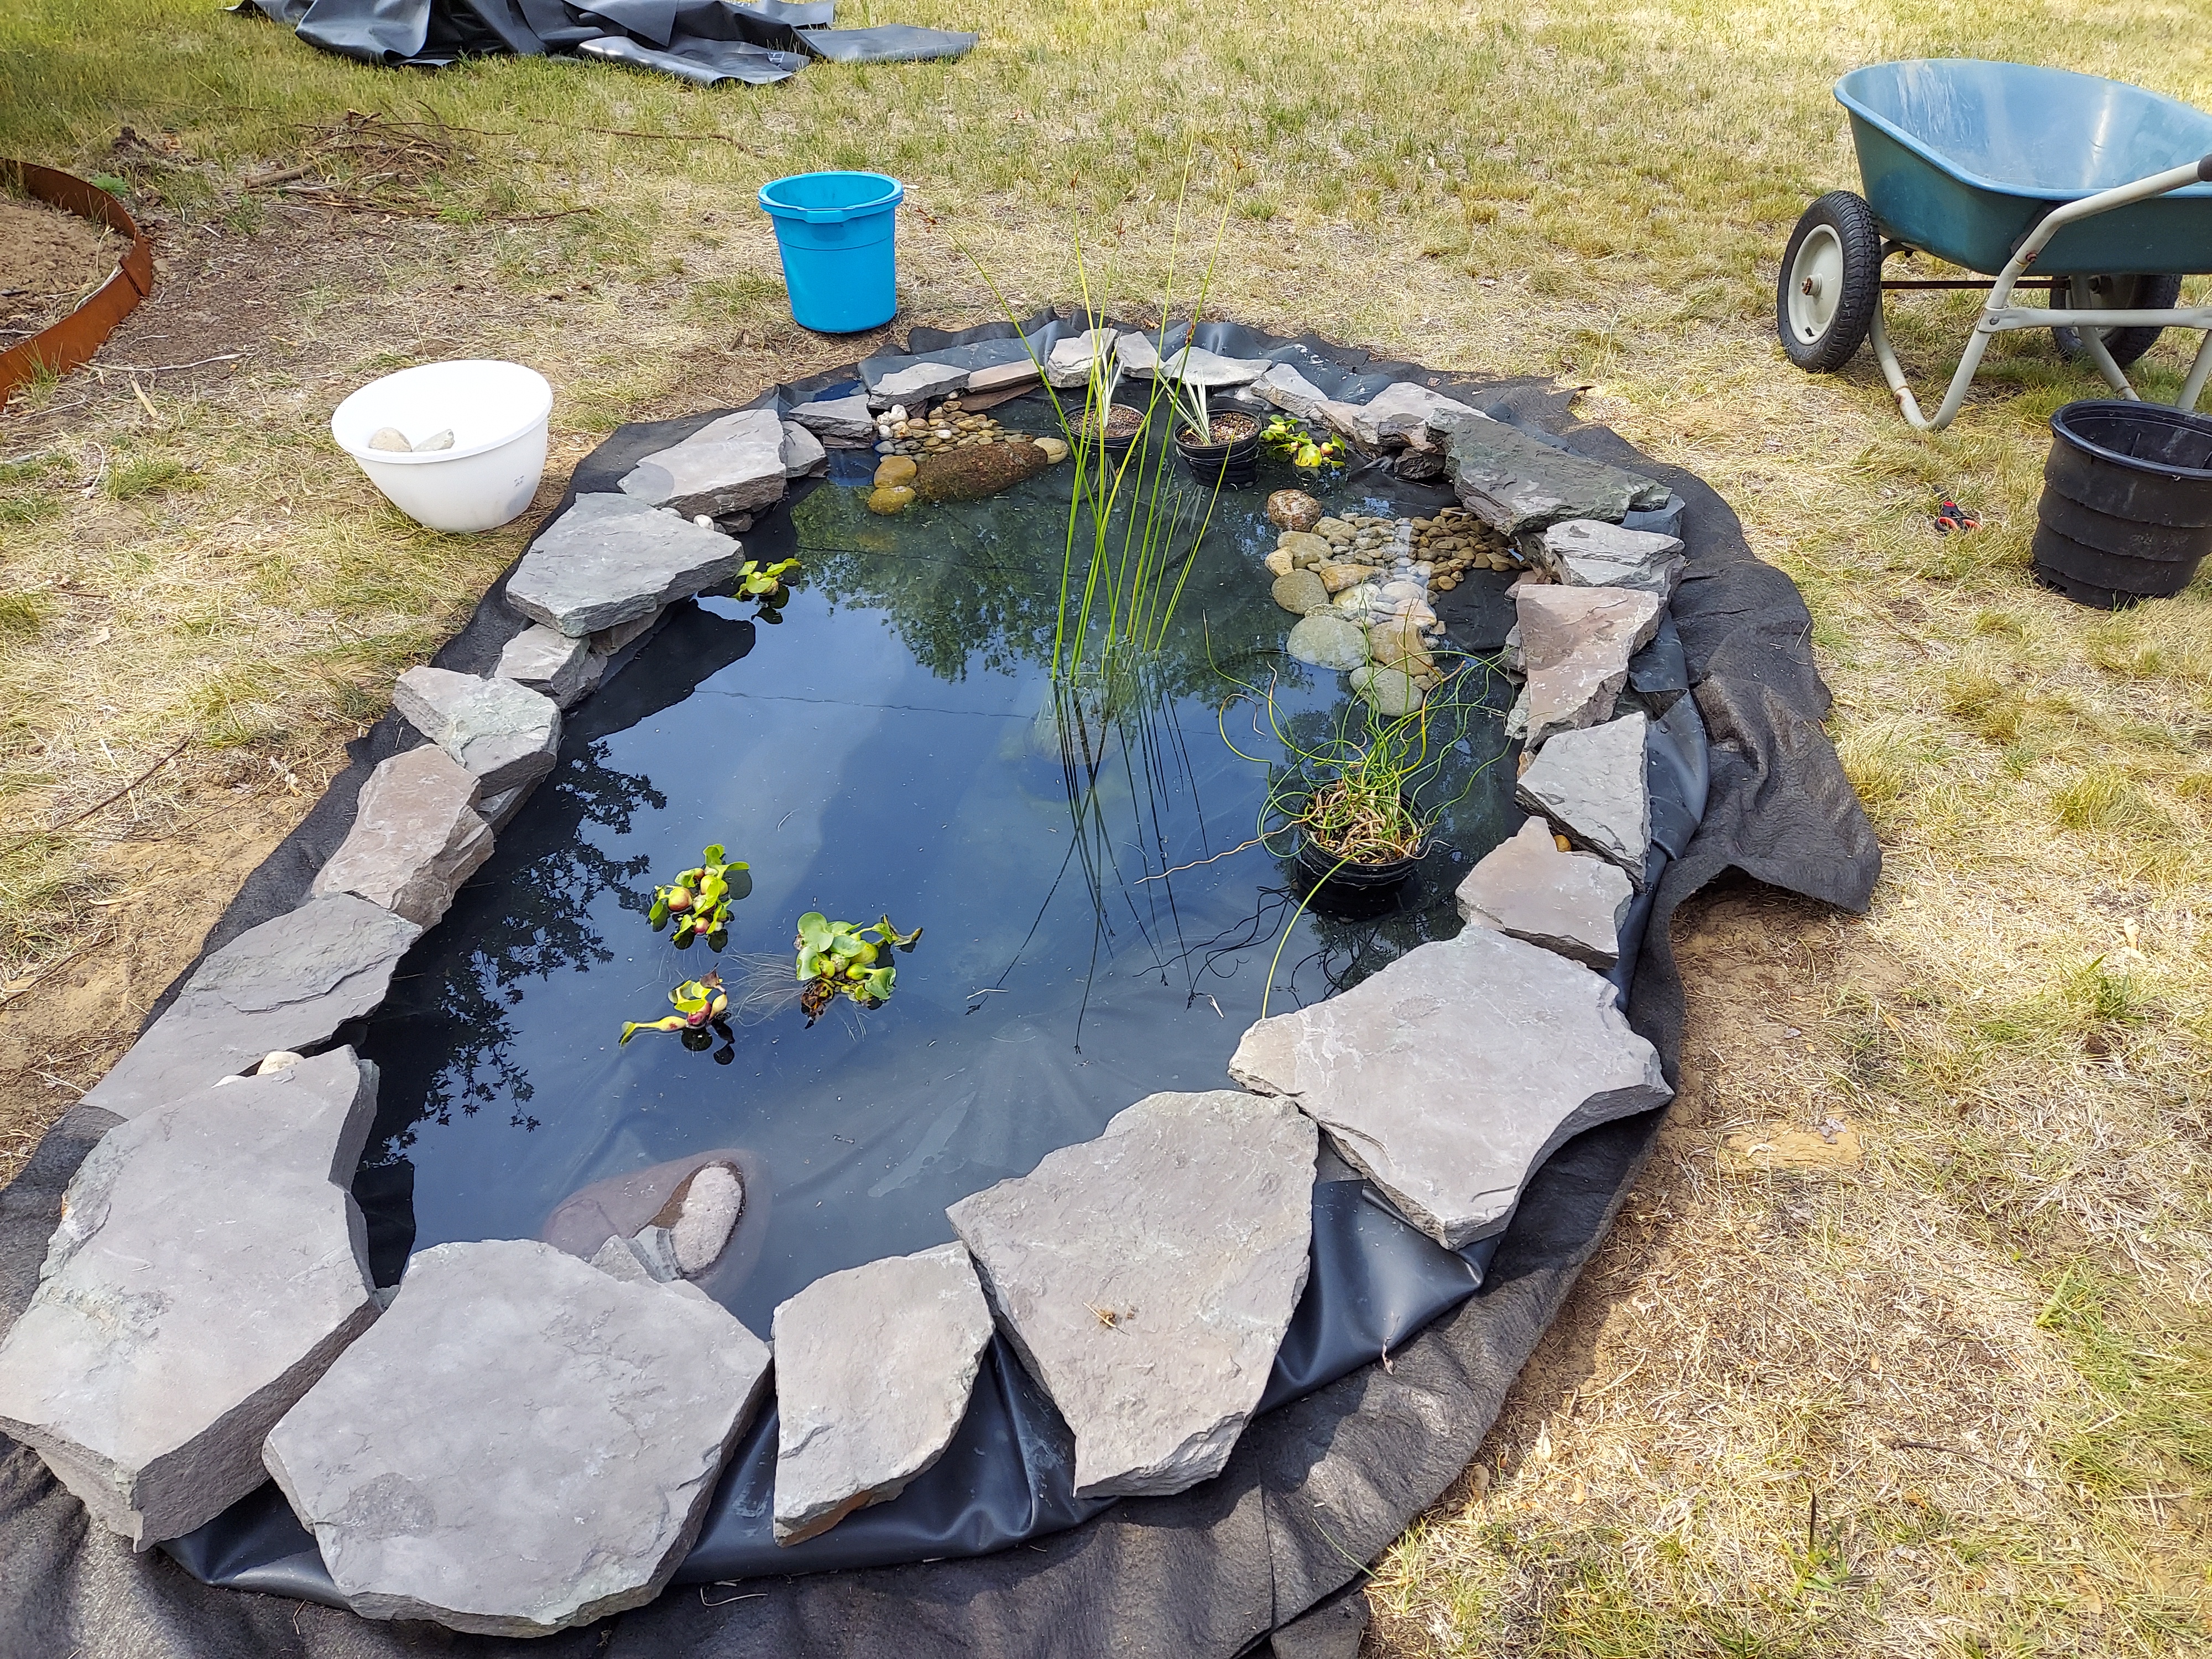
Tuesday I finished placing most of the rocks and filled the pond with water and a few plants. As a last-minute addition, I made a small planting bed on one side of the pond. I had a lot of leftover rocks, and I was trying to think of other ways to use them up. Luckily I also had a new shrub bed on the other side of the yard that was just begging for a flagstone border, so I used a lot of them there. Here’s the mostly-finished pond with the solar fountain trying to function on a cloudy day.
Isn’t it wonderful?! I’m in love with it, and the feeling of having done it myself is priceless. I may never leave my garden again. The birds started drinking from it immediately, even though there’s a birdbath right beside it. Notice how I anchored the floating fountain inside the potted rush in the middle; when I allowed it to float around, it would constantly bump up against one side and spray water outside the pond. I realized that wouldn’t be a good way to keep the water bill down so I came up with this pretty good solution.
One thing I found when researching wildlife pond installations on YouTube was that most of the videos seemed to be from the UK rather than the US. And when I talked to the staff at our local pond nursery, they kept assuming I was going to have a waterfall, pump, and filtration unit; they seemed confused by my idea of a wildlife pond. Apparently most Americans prefer to put fish in their ponds, requiring pumps and mechanical filtration. If I’ve done my research properly, my fishless pond water will be filtered adequately by the plants, along with added beneficial bacteria occasionally (I still have to read more about that). I’ll do regular skimming of floating debris to help keep it clean, and I know I’ll have to do more intense cleaning of the pond periodically, depending on how quickly it gets gunked up.
Here’s the UK video that gave me the confidence to move forward:
One thing that caused me some confusion in my research was coming across one video from a pond company that said that adding rocks to your pond was a MAJOR mistake because it increased the difficulty of keeping it clean. But that idea got a lot of pushback in the comments, and most other instructional videos do include rocks in the ponds. I haven’t done it yet, but I think I’m going to add some medium-sized river rocks to the bottom of my pond. I don’t like looking at a plain black liner under the water, and I think rocks would give so much more interest and provide places for aquatic critters to live. And since my pond is relatively small, I can easily pull rocks out to clean them if necessary.
I still have a lot to learn about managing my pond, but I already know how to enjoy it! The birds are drinking from it, and there have been a couple wasps doing thorough inspection of the nooks and crannies in the rock border. And a couple dragonflies have dipped down to take a look too! I based my pond measurements on the recommendations of the Migratory Dragonfly Partnership (MDP) for a pond to support the dragonfly life cycle. Part of those requirements were to have a surface area of at least 43 square feet, and a total vegetation cover of 50-70%. Note that the website of the MDP was maintained by the Xerces Society and it seems to be gone now. I’ve messaged them to find out what happened to the wonderful resources they had there. Luckily I’d already downloaded their pond guidelines several years ago.
I’ll be adding more plants, and some mosquito dunks to prevent those nasty buggers. But I want to take a few days to rest and enjoy it now, and those things can be done on the next rainy day. If you’ve ever had any interest in having a pond in your yard, I highly recommend that you consider a natural wildlife pond like mine. It has already changed the way I feel about my property. I’ve been building habitat with native plants for five years, and with the addition of this fresh water source, I’ve got an even more productive slice of habitat on my urban lot. I can’t wait to see who shows up to live here with me!

***********
Resources:
In planning my pond I consulted a document called “Dragonfly Pond Guidelines” from the Migratory Dragonfly Partnership. Their project has been discontinued for lack of funding and the website has been taken down, but they’ve given me permission to share this document with you. It’s 28 pages long, authored by Celeste Mazzacano, Dennis Paulson, and John Abbott.

[…] pond, you ask? Well, I have some concerns as I see it coming back to life after its first winter. If you remember, I intended this to be a wildlife pond, with a natural vibe rather than a pristine body of water as […]
LikeLike
[…] pond, you ask? Well, I have some concerns as I see it coming back to life after its first winter. If you remember, I intended this to be a wildlife pond, with a natural vibe rather than a pristine body of water as […]
LikeLike
Good job Kim! Way to go by jumping out and making it happen. Too often we sit back and let doubts stop our progress. Looks like a beautiful addition to your nature haven!
LikeLiked by 1 person
Thanks, Teresa! Yes, self-doubt is a big problem for me…glad I conquered it this time!
LikeLike
Incredible and inspiring, Kim. I loved reading the details behind this project. ❤️
LikeLiked by 1 person
Brilliant! I ‘inherited’ a pond when we moved here 3 years ago. It had no diversity in plant life so I set about sorting that out, now it’s getting a bit overgrown but looks great. I don’t clean the pond, dragon/damselfly larva like a bit of silt and water snails will eat algae but I do remove fallen leaves. In the summer it needs topping up about once a week, I try to use rain water when possible but often have to use the tap water. A good collection of plants will keep it healthy but if you get algae or blanket weed I recommend liquid bio barley extract.
Sit back and enjoy!
LikeLiked by 1 person
Brian, thanks for chiming in with your experience with a natural pond! I’ve got some liquid barley extract on hand now and will be adding some more substrate for the critters. I’m so glad I finally did this! So, do you have any type of pump or fountain in your pond to create movement? My small solar fountain has been struggling for a couple of days without sun, lol.
LikeLiked by 1 person
No, I have no pump or fountain. There was one put in by the original owner but it was removed by his family as it kept blowing the power fuses for the house!
Good oxygenating plants will keep the water conditioned as will a bit of shade. Lilies are good for this but don’t like moving water i.e fountains, you can get varieties suitable for small ponds (I’ve got three in my 12ft x 8ft pond). Also I have a nice Dogwood behind which provides partial shade and is great for freshly emerged dragons and damsels to finish setting their wings, just have to scoop the leaves off in the fall so they don’t foul the water.
LikeLiked by 1 person
Great, thanks!
LikeLike
Awesome – story post.
LikeLiked by 1 person
Thanks, Ron! I appreciate you reading and taking time to leave a comment. 🙂
LikeLike
I’m impressed with your can-do spirit & the results are beautiful.
I had a homemade pond put in about 30 years ago with granite rocks at the edge, a rock waterfall & with a couple of Koi & goldfish to minimize mosquito larvae, plus lots of plants. No filter. It had so many spring peepers that you couldn’t have a conversation anywhere near it. I still miss that pond but make do with 2 bird baths, 1 fountain & 3 drilled out stone pillars set on a rock base over a buried tub. The birds use all of them but alas, no frogs or peepers.
LikeLike
Gail, that sounds wonderful. I’m sure it’s hard not to have that any more. I’m really hoping to get some frogs here soon!
So your pond didn’t have a filter…what kind of maintenance did you have to do on it?
LikeLike
I remember using barley straw in a plastic submerged cage. The water would occasionally get an algae bloom in the summer, but the plants & barley straw eventually cleaned it up. It would get covered in duck weed which I would remove partially so I could see the water.
BTW -I never cleaned rocks.
LikeLiked by 1 person
Thanks for the tip about barley straw. I see it comes in pellets and extract too, so might try that.
LikeLike
Very impressive! Hope you are well now. Looking forward to more posts with the pond and its visitors. 👍
LikeLiked by 1 person
Thanks, Jaya. My back pain is better but the thumb still hurts. But now I have a lovely pond to distract me from the pain. 🙂
LikeLiked by 1 person
Kim-
Quite lovely- I am proud of you!
daryl
LikeLiked by 1 person
Thanks, Daryl!
LikeLike
Excellent job. It took a whole lot of work, but was worth it. Like you say, it will be interesting to see which fauna will discover it.
LikeLiked by 1 person
Thanks, Neil, it sure was worth it!
LikeLiked by 1 person
Good job. It is not only functional it is beautiful. When the plant fill in around it it will be magnificent.
LikeLiked by 1 person
Thanks, Lisa. Yes, it’ll just get better with time!
LikeLike
I’m so impressed by your effort and that lovely result, Kim! Now, about those steroids…heh, heh. Just kidding. I hope you keep us updated with photos and tales of the visitors to your pond. It’s incredible how quickly wildlife adapts to water when you add it to a space. As soon as we get rain that sits in the top of our spa cover, the dragonflies and birds start visiting it. Enjoy!!!
LikeLiked by 1 person
Thanks, Ardys! I don’t know if I’m imagining this, but the birds seem to be much more vocal here in the past couple of days. I like to think they’re all chattering about this cool new water feature, LOL.
LikeLiked by 1 person
Kim! I’m thrilled for you; it looks gorgeous! You GO girl. Be Proud 🙂
LikeLiked by 1 person
Thanks so much, Jean. I am proud of myself for finally committing to this project. And I couldn’t be happier with the results.
LikeLike